패키지 설치
$ pip install weasyprint
$ brew install cairo
$ brew install pango
weasyprint의 경우 그래픽 라이브러리인 cairo와 font관련 라이브러리인 Pango에 의존성을 갖고 있습니다.
또한 pango의 경우 로컬에 있는 font를 사용하기때문에 PC혹은 서버에 한글 font를 설치해야합니다. (한글 폰트 및 의존성 있는 패키지때문에 많은 고생을 했습니다.)
코드 작성
# views.py

def html_to_pdf_view(request, pk):
    advice = get_object_or_404(Advice, pk=pk)
    chat_list = advice.chat_set.all()
    html_string = render_to_string('utils/advice_pdf.html', {'chat_list': chat_list})

    html = HTML(string=html_string)
    html.write_pdf(target='/tmp/mypdf.pdf')

    fs = FileSystemStorage('/tmp')
    with fs.open('mypdf.pdf') as pdf:
        response = HttpResponse(pdf, content_type='application/pdf')
        response['Content-Disposition'] = 'attachment; filename="mypdf.pdf"'
        return response
# utils/advice_pdf.html

<!doctype html>
<html lang="ko">
<head>
    <meta charset="UTF-8">
    <meta name="viewport"
          content="width=device-width, user-scalable=no, initial-scale=1.0, maximum-scale=1.0, minimum-scale=1.0">
    <meta http-equiv="X-UA-Compatible" content="ie=edge">
    <title>Document</title>
</head>
<body>
    <h1 style="text-align: center">상담창</h1>
    <ul style="list-style-type: none;">
    {% for chat in chat_list %}
        <li>
        {% if chat.user.is_superuser %}
            <div>
                <div style="position: relative; display: inline-block; width: 48px; height: 48px; margin-top: 7px; border-radius: 25px;">
                    <span></span>
                </div>
                <div style="display: inline-block; margin-top: 7px; padding: 12px 15px; float: left; border-radius: 0px 12px 12px; background-color: #f0f0f0; color: #333; font-size: 12px; line-height: 17px;">
                    {{ chat.content }}
                </div>
                <div style="display: block; padding-left: 12px; text-align: left; color: #cfcfcf; font-size: 9px; line-height: 19px;">
                    {{ chat.created_at }}
                </div>
            </div>
        {% else %}
            <div>
                <div style="position: relative; display: inline-block; width: 48px; height: 48px; margin-top: 7px; border-radius: 25px;">
                    <span></span>
                </div>
                <div style="display: inline-block; margin-top: 7px; padding: 12px 15px; float: right; border-radius: 0px 12px 12px; border-top-left-radius: 12px; border-top-right-radius: 0px; font-size: 12px; line-height: 17px;  background-color: #4fd2c2; color: white;">
                    {{ chat.content }}
                </div>
                <div style="display: block; padding-right: 15px; text-align: right; color: #cfcfcf; font-size: 9px; line-height: 19px;">
                    {{ chat.created_at }}
                </div>
            </div>
        {% endif %}
        </li>
    {% endfor %}
    </ul>
</body>
</html>
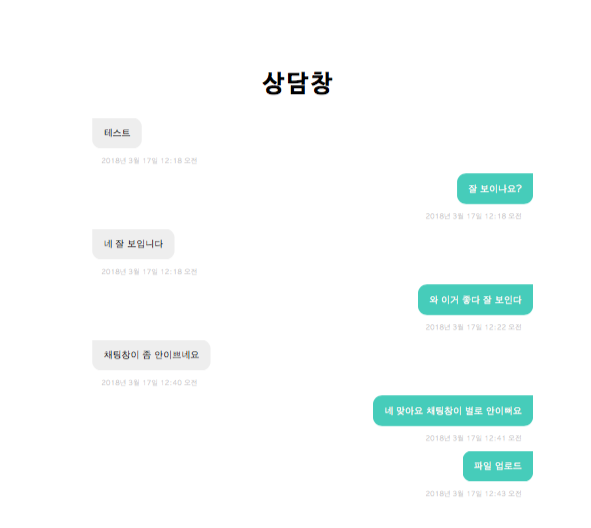
결과물

정리
템플릿 태그인 if for등은 사용이 가능하나 request.user같은 부분은 사용이 불가능함
css파일을 이용할 수 있는 것 같으나 정확하게 알 수 없어 html의 모든 태그들 안에 css를 작성함 추후 css파일 작성해서 진행해볼 예정
대부분의 기능이 작동을 해서 매우 편하게 쓸 수 있는 패키지인 것 같다ㅜ소